

Sharing Bicep Templates
This is the third in a short series of posts focused on Azure Bicep. In the first, we introduced Bicep by highlighting some of its benefits as well as how to deploy templates. The second looked into how we can test resource templates along with how to automate the testing techniques. In this post, we’re going to look into sharing and reusing Bicep templates.
What is a Bicep module?
Bicep modules are effectively Bicep templates called by another Bicep template. This is one of the benefits of Bicep, creating modules to break large templates into smaller blocks to improve readability and reusability. Below is a basic example of creating a storage account in Bicep:
resource storageAccount 'Microsoft.Storage/storageAccounts@2022-09-01' = {
    name: 'sttest'
    location: 'uksouth'
    kind: 'StorageV2'
    identity: {
        type: 'SystemAssigned'
    }
    sku: {
        name: 'Premium_LRS'
    }
}

output storageAccountName string = storageAccount.name
This template can then be referenced from another file using the module syntax:
module storageAccountSymbolicName 'storageaccount.bicep' = {
    name: 'storageAccountStaticName'
}
There are a few details to take note of here
- storageAccountSymbolicName - This represents the module as an object. This could be used to add an explicit dependency on the module for another resource using the syntax
dependsOn: [storageAccountSymbolicName]. Another usage could be to access outputs of the module. To retrieve the storageAccountName output of the example module, the syntax would bestorageAccount.outputs.storageAccountName - storageaccount.bicep - This is the relative file path to the module
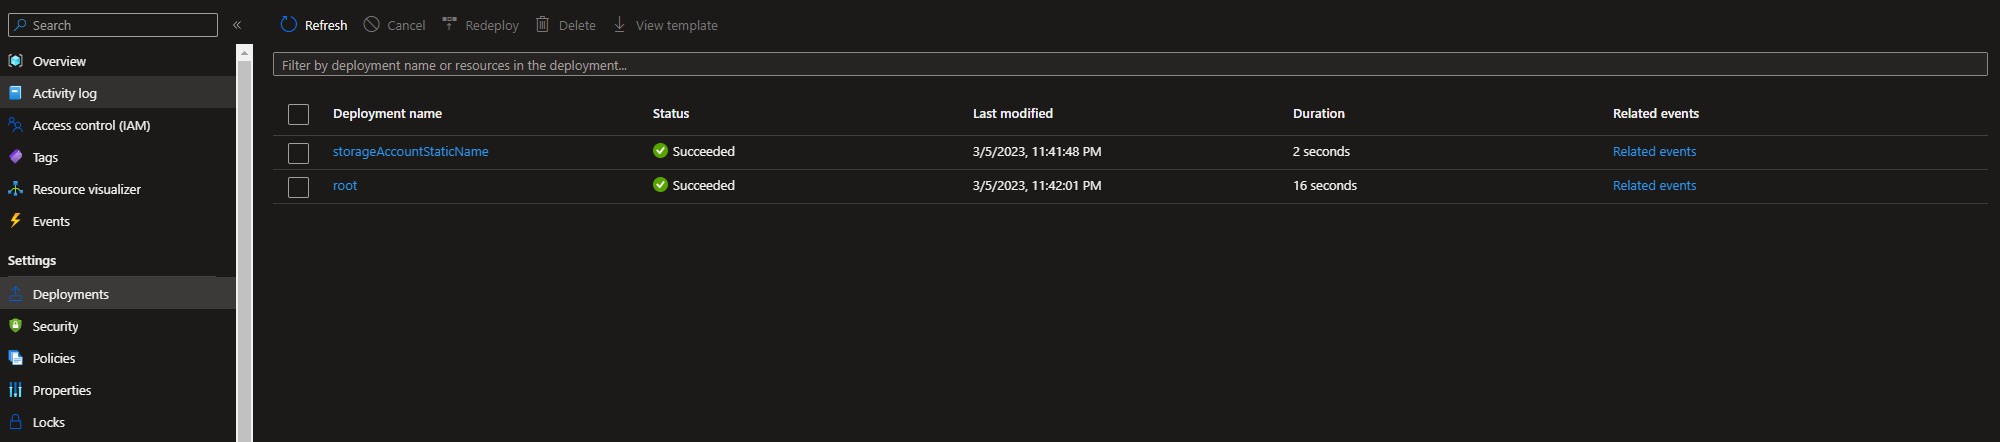
- storageAccountStaticName - When a module is called in a Bicep template, it creates a separate deployment instance in Azure. Deploying the above examples would result in something similar to the one below. Notice storageAccountStaticName is the name of the deployment. Keep in mind that if a static name is used more than once, it can cause conflicts.
When resource templates are deployed, they’re deployed in a scope. Generally speaking, the scope is a resource group (but could be a subscription or management group). As modules create their own deployments, they also get their own scope. The same module can be deployed like below to create a storage account in a separate resource group.
module storageAccount 'storageAccountModule.bicep' = {
    name: 'storageAccountStaticName'
    scope: resourceGroup('anotherResourceGroup')
}
I have often used this for deploying RBAC role assignments for granting a managed identity in one resource group access to a shared resource in a separate group.
Parametrising modules
Where Bicep modules start to gain in value is when they are parametrised. All Bicep templates can be parametrised and when a parametrised template is called as a module, the parameters are passed in using the params syntax. To demonstrate this, I’ve added parameters to the storage account sample module.
param name string
@allowed(['test', 'live'])
param environment string = 'test'
param location string = resourceGroup().location
param tags object = contains(resourceGroup(), 'tags') ? resourceGroup().tags : {}

var sku = {
    test: 'Standard_LRS'
    live: 'Premium_RAGRS'
}

resource storageAccount 'Microsoft.Storage/storageAccounts@2022-09-01' = {
    name: name
    location: location
    tags: tags
    kind: 'StorageV2'
    identity: {
        type: 'SystemAssigned'
    }
    sku: {
        name: sku[environment]
    }
}

output storageAccountName string = storageAccount.name
The mandatory name parameter can then be passed in like below.
module storageAccount 'storageAccountModule.bicep' = {
    name: 'storageAccount'
    params: {
        name: 'sttest'
    }
}
This allows each instance of the storage account module to create a resource with a different name. Notice as well that location, tags and environment are also parameters with default values. This allows modules to be designed to adhere to conventions by default, but also gives flexibility for developers to deviate from the defaults where necessary:
- location defaults to the location of the current resource group
- tags use the tags of the current resource group
- environment defaults to a cheaper sku but allows for a more expensive, resilient sku for live scenarios
Bicep Registry
As mentioned above, Bicep modules can be referenced by filename. When deploying Bicep from a single repo, this is the easiest way to get started. However, as your number of modules grows as well as the need to use these modules in multiple repos, it can become difficult to maintain. There are a few options to get around these issues, such as git submodules or using Azure Pipeline repo resources to reference a central repo of Bicep modules, however, they each have drawbacks.
The recommended approach in Microsoft documentation is to use a Bicep registry. Let’s take a look at how to create the registry, publish a module, using the registry and automating the process.
Creating the registry
Bicep registries make use of Azure Container Registries to host the Bicep modules. A basic ACR resource can be deployed using the sample Bicep below:
param name string
param location string = resourceGroup().location
param tags object = contains(resourceGroup(), 'tags') ? resourceGroup().tags : {}

var containerRegistryName = 'cr${baseResourceNameAlpha}'
resource containerRegistry 'Microsoft.ContainerRegistry/registries@2022-02-01-preview' = {
    name: name
    location: location
    tags: tags
    sku: {
        name: 'Basic'
    }
    properties: {
        adminUserEnabled: false
    }
}
Publishing modules
The hostname of the resulting container registry will be in the format name.azurecr.io. To push modules to the registry you will need to be logged into Azure. To do this through Az Cli run az login. To push modules, the account needs to have RBAC permissions to push images, this can be achieved by having the role AcrPush assigned to the user account. To publish a module use the command
az bicep publish --file filePath --target br:name.azurecr.io/modulename
This command will publish the module file as an image to the Bicep registry. As this is ultimately a container image registry, the modulename is used to give an identifier to the image as well as a version. For example, the command az bicep publish --file appservice.bicep --target br:name.azurecr.io/appservice:23.03.09.01 would add a version to the appservice repository resulting in something similar to below:
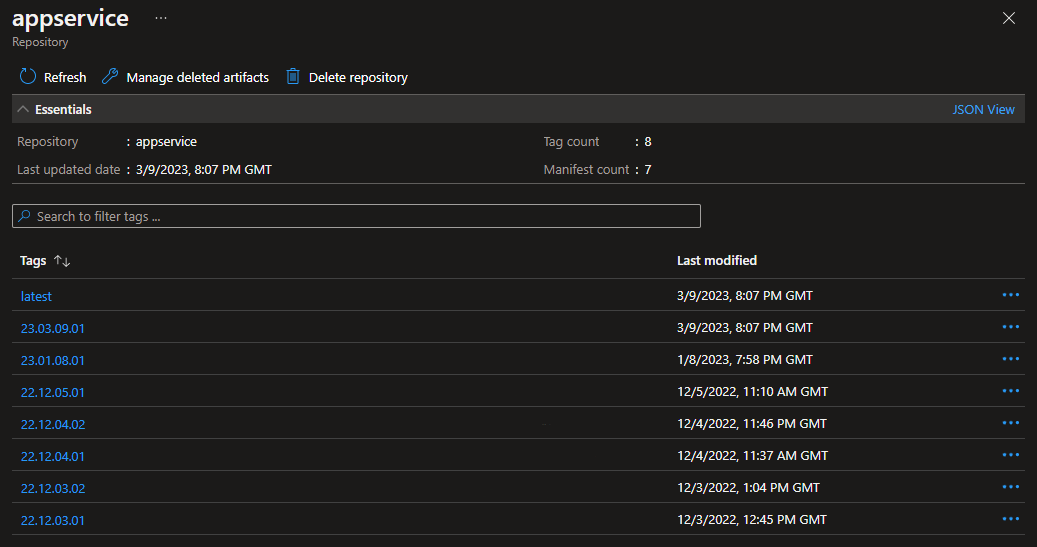
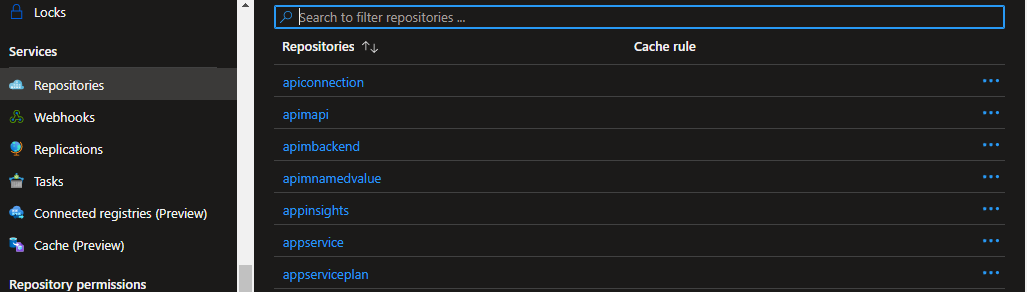
Notice that a history of previous versions is also available so that Bicep templates which use previous module versions can continue to do so without the risk of breaking changes. The Bicep registry is comprised of multiple repositories with each repo representing a different module.
Using the registry
Using the bicep registry is very similar to referencing file-based modules. Instead of using a file path, use the format br:registryname.azurecr.io/modulename:version
module appService 'br:name.azurecr.io/appservice:23.03.09.01' = {
    name: 'appService'
    params: {
        name: name
        location: location
        tags: tags

    }
}
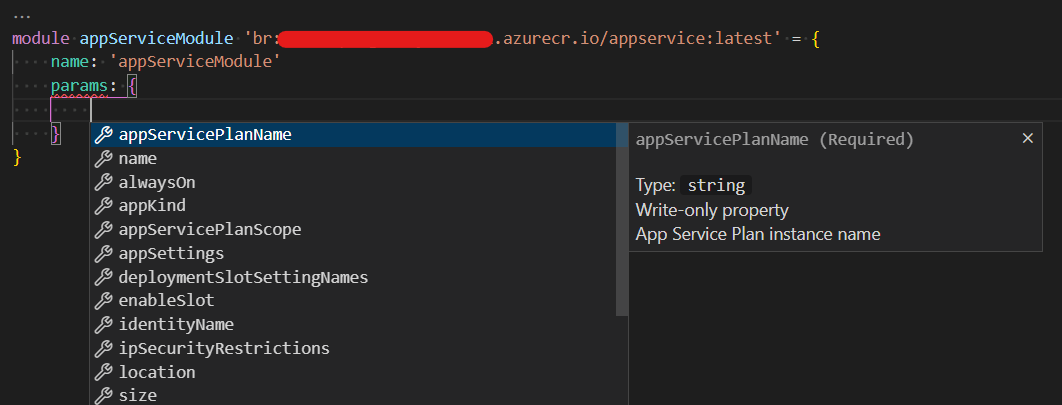
One of the main benefits of using a Bicep registry is that, when combined with the VS Code Bicep extension and logged into Az Cli in the integrated terminal, you get full intellisense for the module including available parameters and outputs complete with any decorators for those values. If you change the module or version of a module being used, the VS Code extension will handle downloading the new template and updating the intellisense in VS Code.
Automating the publishing process
So far, the approach for publishing these modules has been manual. However, these shared modules will form the foundation of deploying resources to Azure where an applications IaC template will stitch together multiple modules. Therefore, it’s important to build automated processes into publishing these templates to ensure all additions and changes are reviewed and tested. How I’ve structured my Bicep modules is in a single repository with a protected main branch. This enforces a pull request process for changes to be reviewed by other developers.
In addition to the pull requests, I’ve also created a CI pipeline for the Bicep module repo which will run the ARM-TTK DevOps extension discussed in the previous post.
name: $(Date:yy.MM.dd)$(Rev:.rr)

trigger:
  branches:
    exclude:
      - main
  paths:
    include:
      - src/*.bicep

stages:
  - stage: ScanBicep
    displayName: Scan Bicep
    jobs:
      - job:
        pool:
          vmImage: ubuntu-latest
        steps:
          - task: Bash@3
            displayName: Print environment variables
            inputs:
              script: env | sort
              targetType: inline

          - task: RunARMTTKTestsXPlat@1
            displayName: Scan Bicep
            condition: succeeded()
            inputs:
              azureServiceConnection: azureSubscription
              templatelocation: src
              resultLocation: '$(Agent.TempDirectory)/results/'
              allTemplatesMain: false
              cliOutputResults: true
              ignoreExitCode: true
              usePSCore: true


          - task: PublishTestResults@2
            displayName: Publish Scan Results
            condition: always()
            inputs:
              testResultsFormat: "NUnit"
              testResultsFiles: $(Agent.TempDirectory)/results/*-armttk.xml
Once a pull request has been approved and the changes merged to main, the module can be published. To do this, I’ve put together an parametrised Azure Pipeline template which uses Az Cli to publish a given module.
parameters:
  - name: azureSubscription
    displayName: Azure Subscription to restore private bicep modules
    type: string
  - name: bicepRegistry
    displayName: Bicep registry to publish the module to
    type: string
  - name: bicepPath
    displayName: Path to the bicep module
    type: string
  - name: skipTests
    type: string
    default: ''

stages:
  - stage: Publish
    jobs:
      - job: PublishBicepModule
        steps:
          - task: Bash@3
            displayName: Print Environment Variables
            inputs:
              script: env | sort
              targetType: inline

          - task: PowerShell@2
            name: InstallAndUpgradeBicep
            displayName: Install And Upgrade Bicep
            inputs:
              pwsh: true
              targetType: inline
              script: |
                az bicep install
                az bicep upgrade

          - task: AzureCLI@2
            name: PublishBicepModule
            displayName: Publish Bicep Module
            inputs:
              azureSubscription: ${{parameters.azureSubscription}}
              scriptLocation: inlineScript
              scriptType: pscore
              inlineScript: |
                $moduleFileInfo = [System.IO.FileInfo]::new("${{parameters.bicepPath}}")
                $moduleName = $moduleFileInfo.BaseName.ToLower()
                Write-Host "moduleName=$moduleName"

                $targetVersioned = "br:${{parameters.bicepRegistry}}/$moduleName`:$(Build.BuildNumber)"
                Write-Host "targetVersioned=$targetVersioned"
                az bicep publish --file ${{parameters.bicepPath}} --target $targetVersioned

                $targetLatest = "br:${{parameters.bicepRegistry}}/$moduleName`:latest"
                Write-Host "targetLatest=$targetLatest"
                az bicep publish --file ${{parameters.bicepPath}} --target $targetLatest
              FailOnStandardError: true
The template publishes a version of the module using the Azure Pipeline variable Build.BuildNumber as well as a latest version. Latest is often a feature of Docker images and allows for a tag to always reference the latest version. I’ve found this technique useful to allow developers to get started with a module quickly before referencing a particular version for go live. This pipeline template is then used by a top-level pipeline for each module so that pipeline triggers can be scoped to a particular file so that only modules changed by a merge to main are published.
name: $(Date:yy.MM.dd)$(Rev:.rr)

trigger:
  branches:
    include:
      - main
  paths:
    include:
      - src/storageaccount.bicep

extends:
  template: templates/PublishBicep.azure-pipelines.yml
  parameters:
    azureSubscription: azureSubscription
    bicepRegistry: name.azurecr.io
    bicepPath: ./src/storageaccount.bicep
Summary
Across this series of posts we’ve looked at 3 key areas of Bicep:
- Introducing and using Bicep
- Testing Bicep templates
- Sharing Bicep templates
During this post we’ve looked at:
- how to create and use a Bicep module
- creating a Bicep registry
- manually publishing modules to the registry
- automating the testing and publishing of modules
The result is that we have a central catalogue of reviewed, tested and versioned Bicep modules which can be reused in multiple deployments. This helps give greater confidence in deployments as well as improve consistency and reduce complexity in the top-level Bicep templates. I hope this and the previous 2 articles have been a useful introduction to Bicep as well as how to incorporate it into your DevOps processes.
Comments